Game Guide
Create New Accounts
Many years ago, unknown adventurers sacrificed themselves to ensure that the Satan Morocc would never be resurrected after being sealed under the desert town of the same namesake. The years wore on and the harsh climate of the desert started to crack the seal...then one day, it broke into pieces and Satan Morocc was resurrected!
Upon his emergence, Satan Morocc transformed the desert region that once imprisoned him into a devastated land of death. No amount of mortal effort could reform the land. Brave warriors and Guild Alliances from all over the world clashed in a fearsome battle against Satan Morocc to try to save the Desert Town Morocc. A great many sacrificed their lives. Finally, the Alliance succeeded in chasing Satan Morocc from the Midgard Continent into the Dark Dimension.
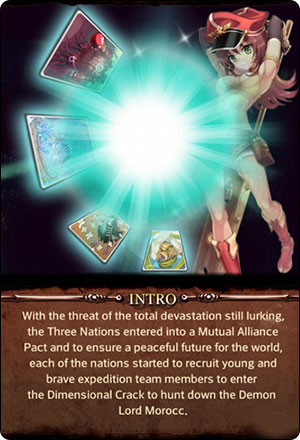
The Dimensional Gorge that formed when Satan Morocc was defeated is the only path that connects the Midgard Continent with the Dark Dimension. Even after Satan Morocc's escape, the Dimensional Gorge remained. The ever present threat of total devastation loomed over the Midgard Continent and all its peoples. The Three Nations decided to enter into a Mutual Alliance Pact to ensure a peaceful future for the world. Each of the Nations began recruiting young and brave expedition team members to enter the Dimensional Gorge and hunt down Satan Morocc and end his reign of terror once and for all.
Select Country

Rune Midgarts:
In the southern part of the continent, this giant empire has magnificent cities and flourishes with diverse culture and trade. The Capital City, Pontera, is the largest of the trade cities on the continent with countless merchants and tourists from all over the world passing through it every day.
Schwarzwald Republic:
The Schwarzwald Republic is a nation with a presidential government system. Their technological advances include reinforced steel and gun powder. The Capital city of Juno is also known as the City of Sage. This industrial city is home to the continents greatest research in magical technology. The majority of the other cities concentrate on research facilities and factories which keep the economy soring high. However, there are slums which illustrate where the city failed to bring its economic success full circle.
Nation Arunafeltz:
The Nation of Arunafeltz is a religious country that serves Goddess Freyja. With the majority of the country a barren wasteland, the main distinction is the Capital City of Lahelman which is surrounded by lush green lands. The devoted peoples of this nation are exemplified by the numerous temples and facilities throughout the city for honoring Goddess Freyja. But, are they perhaps too zealous with their ill-guided faith? There are always those that seek to spread their beliefs beyond themselves onto conquered neighboring nations...
Select Initial Camp Location
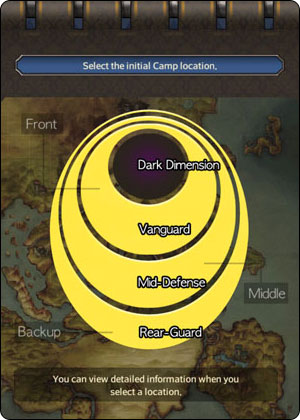
Vanguard:
The foremost front line closest to the Dark Dimension. There is no additional Resource production since there are no Resource Fields nearby. It's difficult in the beginning but you can quickly spearhead into the Dark Dimension and achieve unprecedented growth. However, the Camp you build in the Dark Dimension is open to attacks by enemy nations so be sure to build a tight defense.
Mid-Defense:
The region at around half way to the Dark Dimension. You can achieve balanced development of the Camp while advancing into the Dark Dimension. But in reality, you fall a little short in both ways compared to other regions. This region is recommended for adventurers who do not enjoy single-sided extreme, but balanced game play.
Rear-Guard:
The farthest region from the Dark Dimension. It's difficult to join battles in the Dark Dimension from here, but with abundant Resource Fields in the area, you can achieve rapid development of the Camp. If you are more into developing and growing characters rather than the excitement of battles, then this will be your perfect choice.
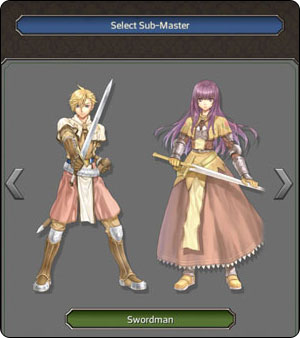
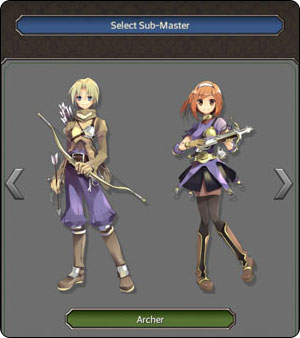
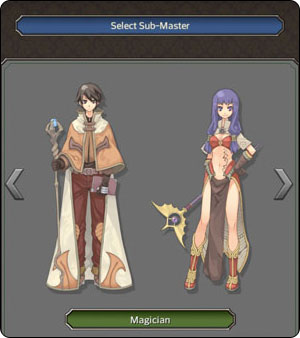
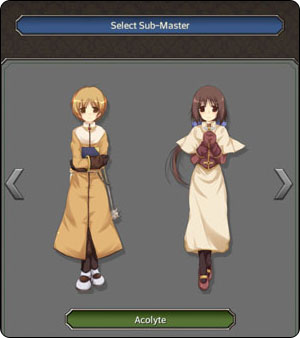
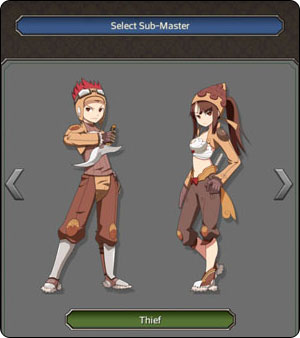
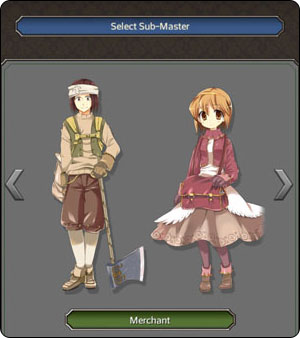
Choose a Sub-Master
Create New Accounts
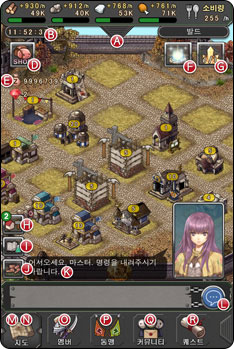
- Resources: Tap and see the amount of resources, the military strength, amount of food, and contributiveness of the camp. (If you tap, detailed description screen appears).
- Server Time: Standard Server time.
- Name of Camp: Shows the name of the camp you see on the screen.
- Shop: Buy items with Shop Points.
- Zeny and Magic Stone: Amount of Zeny (game money) and Magic Stone you have.
- Buff Effect: Shows the Buff Effect of the time-limited items and skills applied to the camp.
- Sub Camp: Shows the number of sub camps. Tab to see the list of sub camps and favorites.
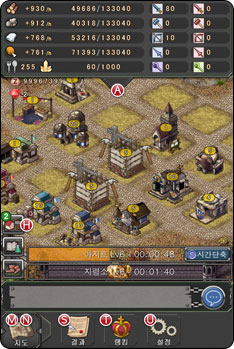
- Construction Status: Tab to check the construction status, use items or cancel construction.
- Research Status: Tab to check the research status, use items or cancel research.
- Movement Status: Tab to check the movement status, use items or cancel movement.
- Sub-Master: You can ON/OFF the Sub-masters' notification in 'Option'.
- Chat: Go to chat screen.
- Camp: Shows the camp's buildings, level, construction status.
- Map: Shows the map of near the camp area. You can send troops to fight battles.
- Members: Shows information of the Guild's members.
- Alliance: Create new alliance or see the current alliance's info.
- Community: Use the forum or exchange messages.
- Quest: Quests' info.
- Result: Shows the result of the battles, transportation, and trades.
- Ranking: Shows the rankings of the countries, alliances, guilds, and members.
- Option: Logout, On/Off Notification, Help.
Buildings
There are three types of buildings: buildings to produce the resources, buildings to set up strategies for battles, and complementary facilities. You need to build some buildings first to build certain other buildings.
1. Buildings for resources
- Lumber Camp: Produce lumber.
- Quarry: Produce stone.
- Mine: Produce ore.
- Farm: Produce food.
- Storage: Store products.
- Wood mill: Increases lumber production.
- Stonemasonry: Increases stone production.
- Steel mill: Increase the ore production.
2. Strategic Buildings
- Safe house: A place to keep the Imperium that maintains the camp. When Imperium's destroyed, the camp collapses.
- Command Center: You can check the current status of the guild members and your troops, and order to retreat. You can also send the guild members to battles depending on your level.
- Magic Shield: When the camp's under attack, defense bonus will be given to the defense troops according to the level of buildings.
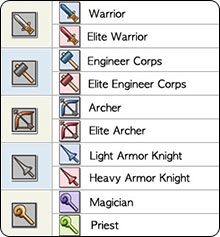
- Training Center for Warriors: Recruit warriors and high level warriors.
- Training Center for Archers: Recruit archers and high level archers.
- Training Center for Engineers: Recruit engineers and high level engineers.
- Training Center for Knights: Recruit lightly equipped knights and heavily equipped knights.
- Training Center for Sorcery Boot Camp: Recruit magicians and cleric.
- Offense Training Center: Increase the level of offense.
- Defense Training Center: Increase the level of offense.
- Skill Research Center: Research new skills for the guild members. (Build in Main Camp only)
3. Complementary facilities
- Base camp of Guild: Recruit guild members, or deploy them. (Build in Main Camp only)
- University of Adventurers: Research Mercenary, shorten the time amount to recruit.
- Job Placement Office: Can make guild members of certain level to change jobs to the upper class. (build in Main Camp only)
- Market: Trade resources and items.
- Factory: Fabricate items (Build in Main Camp only)
Play Game
1. Start by finishing the quests
- Start the game and Tutorial Mode will begin. Please follow the instructions so you can get used to the movements and controls of the game.
- You will get the rewards in the ends of every quest. So it is more practical to play game by following the quests, than playing freely.
2. Establish the foundation by developing the camp
- Establish facilities of camp through collecting resources. The more you build facilities, the more you can collect resources effectively. Consequently it will make it possible to strengthen military strength easily.
3. Make more powerful guild
- Recruit new guild member at Guild HQ or Item Shop. You can also strength your force by recruiting mercenary at training center.
- First of all, find the nearest dungeon and hunt monsters so that have your member level up and acquire items.
- In the Skill Camp, guild members are able to learn new skill. Also, members are able to change their job through Class Training Center.
- Don't forget to increase ATK and DEF in Attack and Defense Boot camp. (ATK and DEF training will be applied to those mercenaries belong to the camp.)
4. Into the Dark Dimension
- If you enter Dark Dimension located at the middle of the world map, you can get EXP and contribution. Specially in the Dark Dimension, you can attack other camps through the battle with guild in other countries.
- However, only those set up the camp in the Dark Dimension are available to attack other camps. So if you want to enjoy PVP, you should go to Dark Dimension.
Growth
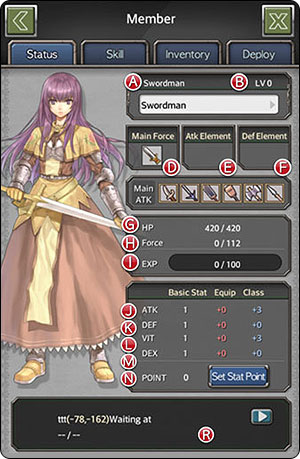
- Job: Job description.
- Level: The maximum level is 20.
- Name: You can change it in the status window.
- Main Force: If you put proper force, ATK will be increased. (Warrior/Engineer corps, Archery, Knight, Sorcerer)
- ATK element: it will be activated when putting property card in it. ATK will be increased based on skill and armor's property.
- DEF element: it will be activated when putting property card in it. ATK will be decreased based on attacker's weapon property.
- HP: Current and Maximum status of stamina based on the level and VIT.
- Force: Current and Maximum attachment figure based on the level and VIT.
- EXP: Current EXP and EXP needed to level up.
- ATK: ATK equals Attack Power. It can be upgraded with ATK + Skills.
- DEF: DEF equals Defense Level. This is applied only during defense.
- VIT: VIT equals Vitality Level. Higher VIT increases Max HP and max number of mercenaries.
- DEX: DEX equals Dexterity Level. Higher DEX increases Skill Activation rate.
- S-point: 2 S-points are awarded at each time you level up. These must be distributed carefully.
- Basic Stat: Basic stat + Stat point.
- Equip: Stats increased by wearing items. When you take off items, effect will be disappeared.
- Class: Compensation stat. it can be changed once you change your job.
- Current Location: Current Location. Once you tab it, you will transfer to the map.
Member Growth
1. Leveling Up Members
- Through dungeon or battle at Dark Dimension, EXP will be acquired. Every time member's level increases, 2 Status point will be given.
- ATK: ATK equals Attack Power. It can be upgraded with ATK + Skills.
- DEF: DEF equals Defense Level. This is applied only during defense.
- VIT: VIT equals Vitality Level. Higher VIT increases Max HP and max number of mercenaries.
- DEX: DEX equals Dexterity Level. Higher DEX increases Skill Activation rate.
2. Learn new skill.
- Carry out study of new skill at Skill Research camp in the main camp.
- After study of a new skill is done, you can choose a member in the main camp and have him or she learn the skill.
3. Use of skill
- If % sign is shown in the skill, this skill is able to use at the battle only.
- Skill containing Skill-Activation-Rate effect will be considered first in battle situation. When activating, it will increase other skills' activation rate.
- Active skill with 'USE' button is only available when you are staying at your camp location; skill effect and standby time are 120 minutes (2 hours).
- Skill effect time displays on the buff effect window at main screen.
- You member cannot receive an order when they are using or standby for skills, nor they can participate on the battle.
4. Member Activity
- At Skill Research Lab, you can increase attribute for certain chance by activating available member. But, be aware of that member who helped you increase the attribute will leave the guild.
- Research success depends on the displayed success rate.
Weapon Equipment
Equipping proper weapon for your class will give you extra attack rate. Each class has different type of weapons that goes well with them.
1. Buildings for resources
- Gunslinger: Gun (+)
- Taekwon Master: Book (+)
- Guillotine Cross: Dagger, One-Hand Sword, Katar
- Knight: Dagger, One-Hand Sword, Two-hand Sword, Blunt, Axe, Spear
- Novice: Dagger, One-Hand Sword, Wand, Blunt(+)
- Ninja: Dagger, Ninja Sword(+)
- Dark Knight: One-Hand Sword, Two-hand Sword, Axe
- Dancer: Dagger, Bow, Whip
- Ranger: Dagger, Bow
- Rogue: Dagger, One-Hand Sword, Bow
- Lord Knight: Dagger, One-Hand Sword, Two-hand Sword, Blunt, Axe, Spear
- Royal Guard: Dagger, One-Hand Sword, Two-hand Sword, Blunt, Axe, Spear
- Rune Knight: Dagger, One-Hand Sword, Two-hand Sword, Blunt, Axe, Spear
- Magician: Dagger, Wand
- Merchant: Dagger, One-Hand Sword, Blunt, Axe
- Monk: Wand, Blunt, Fist
- Mechanic: Dagger, One-Hand Sword, Blunt, Axe
- Minstrel: Dagger, Bow, Instrument
- Bard: Dagger, Bow, Instrument
- Blacksmith: Dagger, One-Hand Sword, Blunt, Axe
- Shaman: Wand, Blunt, Book
- Sage: Dagger, Wand, Book
- Swordman: One-Hand Sword, Two-hand Sword, Blunt, Axe, Spear
- Sorcerer: Dagger, Wand, Book
- Soul Linker: Dagger, Wand
- Sura: Wand, Blunt, Fist
- Shadow Chaser: Dagger, One-Hand Sword, Bow
- Super Novice: Dagger, One-Hand Sword, Wand, Blunt
- Sniper: Dagger, Bow
- Stalker: Dagger, One-Hand Sword, Bow
- Thief: Dagger, One-Hand Sword, Bow
- Archer: Dagger, Bow
- Archbishop: Wand, Blunt, Book, Fist
- Alchemist: Dagger, One-Hand Sword, Blunt, Axe
- Assassin: Dagger, One-Hand Sword, Katar
- Assassin Cross: Dagger, One-Hand Sword, Katar
- Acolyte: Wand, Blunt
- Warlock: Dagger, Wand
- Wanderer: Dagger, Bow, Whip
- Wizard: Dagger, Wand
- Generic: Dagger, One-Hand Sword, Blunt, Axe
- Gypsy: Dagger, Bow, Whip
- Champion: Wand, Blunt, Fist
- Kafra Employee: Book
- Crusader: Dagger, One-Hand Sword, Two-hand Sword, Blunt, Axe, Spear
- Creator: Dagger, One-Hand Sword, Blunt, Axe
- Clown: Dagger, Bow, Instrument
- Taekwon: Bare Hand(+)
- Paladin: Dagger, One-Hand Sword, Two-hand Sword, Blunt, Axe, Spear
- Professor: Dagger, Wand, Book
- Priest: Wand, Blunt, Book, Fist
- High Wizard: Dagger, Wand
- High Priest: Wand, Blunt, Book, Fist
- Hunter: Dagger, Bow
Class Upgrade
When your member's level is 10, 15, 20, they can upgrade their class at the Class Training Center. For each upgrade, your Class Training Center must be upgraded to level 1, 10, and 15. - In order to upgrade your member to 4th level class, you need 'Magic Stone of Emotion' which can be obtained from Dungeon or Dimension battle.
- Novice(1st) - Super Novice(2nd)
- Swordman (1st) - Knight (2nd) - Lord Knight(3rd) - Rune Knight(4th)
- Swordman(1st) - Crusader(2nd) - Paladin(3rd) - Royal Guard(4th)
- Magician (1st) - Wizard (2nd) - High Wizard(3rd) - Warlock(4th)
- Magician(1st) - Sage (2nd) - Professor (3rd) - Sorcerer (4th)
- Archer (1st) - Hunter (2nd) - Sniper(3rd) - Ranger(3rd)
- Archer(1st) - Bard(2nd) - Clown(3rd) - Minstrel (4th)
- Acolyte (1st) - Priest(2nd) - High Priest(3rd) - Arch Bishop(4th)
- Acolyte(1st) - Monk(2nd) - Champion(3rd) - Sura (4th)
- Thief (1st) - Assassin (2nd) - Assassin Cross (3rd) - Guillotine Cross (4th)
- Thief(1st) - Rogue(2nd) - Stalker(3rd) - Shadow Chaser (4th)
- Merchant(1st) - Blacksmith (2nd) - White Smith(3rd) - Mechanic(4th)
- Merchant(1st) - Alchemist (2nd) - Creator(3rd) - Generic(4th)
- Taekwon(1st) - Taekwon Master (2nd)
- Taekwon(1st) - Soul Linker (2nd)
Item
1. Equipment
- This is the items that members can equip. There're helmets, weapons, shields, armor, shoes, and accessories.
- Level requirement will be displayed in the item detail.
- If you have slot [1] [2] [3], you can equip refinement/Upgrade cards and if you have S slot, you can equip attribute cards.
2. Belongings
- Establish facilities of camp through collecting resources. The more you build facilities, the more you can collect resources effectively. Consequently it will make it possible to strengthen military strength easily.
3. Consumables
- The items that can recover HP.
4. Materials
- The materials to mix the item from the creator.
- Players can get this item from the dungeons and battle in the very rare chance.
- "Magic stone of Emotion" is necessary to job change to 4th class. (Players must have this item in the bag when they request job change.)
Card
1. Character card
- You can get the cards from the character capsule and also can trade the cards with the other guild members from the auction character.
- You can invite the members when you use this card in the store, in this case, you can get the higher EXP than invite the members via guild headquarters.
2. Attribute card
- This card can provide the attribute in weapon and armor.
- You can equip the card if you have S slot in your weapon and armor.
3. Refinement card
- This card can give the bonus points to your stats (ATK, DEF, VIT, DEX).
- You can equip the card in slot [1], [2], [3].
- You can get the cards from the dungeons and card capsule.
4. Skill card
- Card that can use skill in the battle.
- You can equip the cards in slot [1], [2], [3].
- You can get the cards from the dungeons and card capsule.
Refine/Mix
1. Equip card in the Item
- If you have slot [1] [2] [3], you can equip refinement/skill cards and if you have S slot, you can equip attribute cards.
- You can find the available card list when you double tab the empty slot (green/blue = refine/skill card, red=attribute card).
- Only available cards can be displayed.
- Cards can't be deleted once you equip it.
2. Item mix
- You can mix the base item and material item to [1] item in creator. ("Success" is displayed.)
- You can get the Item [2], [3], [1]S, [2]S, [3]S in very rare chance. ("Lucky" is displayed.)
- You can lose both base item and material item if you failed to mix. ("Fail" is displayed.)
3. Item trade
- You can sell your item at the auction and also buy the item from there.
- The max 5 items can be entered in the auction, and it can be canceled if the item is not sold out in 7 days.
- All items can be traded except the cash item.
4. Item sell
- You can sell the items in the market and get the resources and Zeny.
- Only players who are in the store and camp area can sell the items.
- Resources and Zeny will be entered in main camp.
Battle
Soldier
- If you assigned the soldiers, battle power will be stronger even player's EXP is not much high.
- Attack power will be improved if you assigned the appropriate the solders.
- The higher attack/defense power level will be better. However, attack/defense power level is only applied to the soldiers in the camp.
- Warriors: The speed of recruiting is kind of fast and the attack/defense power is generally good.
- Engineers: The speed of the moving is slow but they have good defense power and also can get the bonus when they attack.
- Archer Class: High attack power but rather lower defense power.
- Knight Class: high movement speed and high stat but production time takes long and exhaustion of resources is big
- Magician Class: Even though production time takes long and exhaustion of resources is big, attack power in fortress is huge..
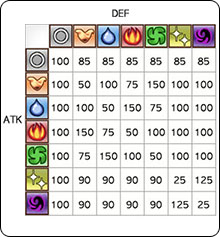
Compensation of properties
- Attackers compensate % of attack power based on their own and defenders' properties.
Dungeon
Soldier
- Mysterious construction in the new world, Ash Vacuum. Rewards such as items or magic stone will be given once players hunt monsters in the dungeon.
- Properties in the field has set (Earth/Water/Fire/Wind/Light/Darkness), and monsters appeared in the dungeon will be decided based on properties.
Dungeon Drop items
- Earth: Potion, Armor, Helm, Dagger, instrument, Ninja sword, Property card, Enhance card, Skill card, Magic stone
- Water: Potion, Shoes, Shield, Dagger, two-handed sword, Whip, Property card, Enhance card, Skill card, Magic stone
- Fire: Potion, Shoes, Helmet, Sword, Blunt Weapon, Gun, Property card, Enhance card, Skill card, Magic stone
- Wind: Potion, Armor, Shield, Blunt Weapon, Bow, Book, Property card, Enhance card, Skill card, Magic stone
- Light: Potion, Armor, Shoes, Staff, Axe, Katar, Property card, Enhance card, Skill card, Magic stone
- Dark: Potion, Helmet, Shield, Staff, Spear, Fist, Property card, Enhance card, Skill card, Magic stone
Dungeon Battle
- The outcome of battle will be decided based on attacker's total ATK and defender's total DEF.
- To reduce damage of battle, it is advantageous to have much more ATK.
- If you win at dungeon battle, you will go to the next floor next time (you can target one floor at once)
- Even though you successfully activate "Confusion Skill", the opposite party can block to activate the skill (Confusion skill: decrease the opposite party's ATK or DEF)
Dark Dimension
Main Camp and Sub-Camp
- Main camp is in the country and it can't be a target from other guilds. However, there's a possibility to be attacked by monsters but Empelium won't be destroyed.
- Sub-camp in the country can't be a target from other guilds. However, there's a possibility to be attacked by monsters and it can result in destruction of Empelium.
- Sub-camp in the Dark Dimension can be a target from other guilds and there's possibility of destruction of Empelium.
HP Recovery
- HP of members awaiting in the camp recovers as time goes by..
- If you return from battle with HP status 0, your status turns into 'Recovery'. You can't order anything until full HP recovery.
Battle in Dark Dimension
- In the Dark Dimension, you are only able to attack to a connecting point of your own country. (able to attack the point located in diagonal )
- You can seize an Empty Field or a Resource Field in Dark Dimension by dispatching members from the camp in the country. However, you can attack other's camp or dungeon only when you dispatch members from the camp in the Dark Dimension.
- As of battle for an Empty Field or a Resource field, no matter what you win or not, if you can't defeat them all, you can't stay but force to return your camp.
- If you battle with the member of enemy in Dark Dimension, you both will be forced to return to your camp regardless of victory or defeat.
- When members of several groups are trying to battle, the first attacker and defender to arrive will start to fight man to man.
- When defending a camp in Dark Dimension, the defender who doesn't belong to the camp won't get 'camp barrier bonus'.
- If your camp is a target of enemy in Dark Dimension, you will get a warning message through sub-master.
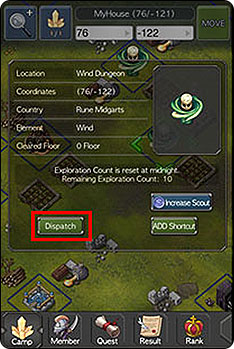
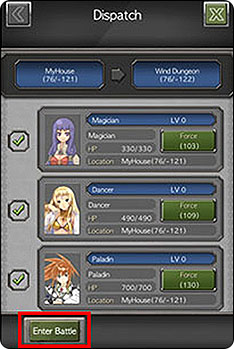
Dispatch
- Double-click destination and detail pop-up window will be shown. Then click "Dispatch" button
- Select group based on the location of departure among awaiting member (maximum 5 people)
- Select the member to dispatch. You can choose either attack and occupy or attack and recall back.
- Number of members you can dispatch will be decided based on the level of commander center that the member, who gets picked first, belongs to.
- Mercenary assignment is available only when the members are in the camp.